Sunday, 29 September 2013

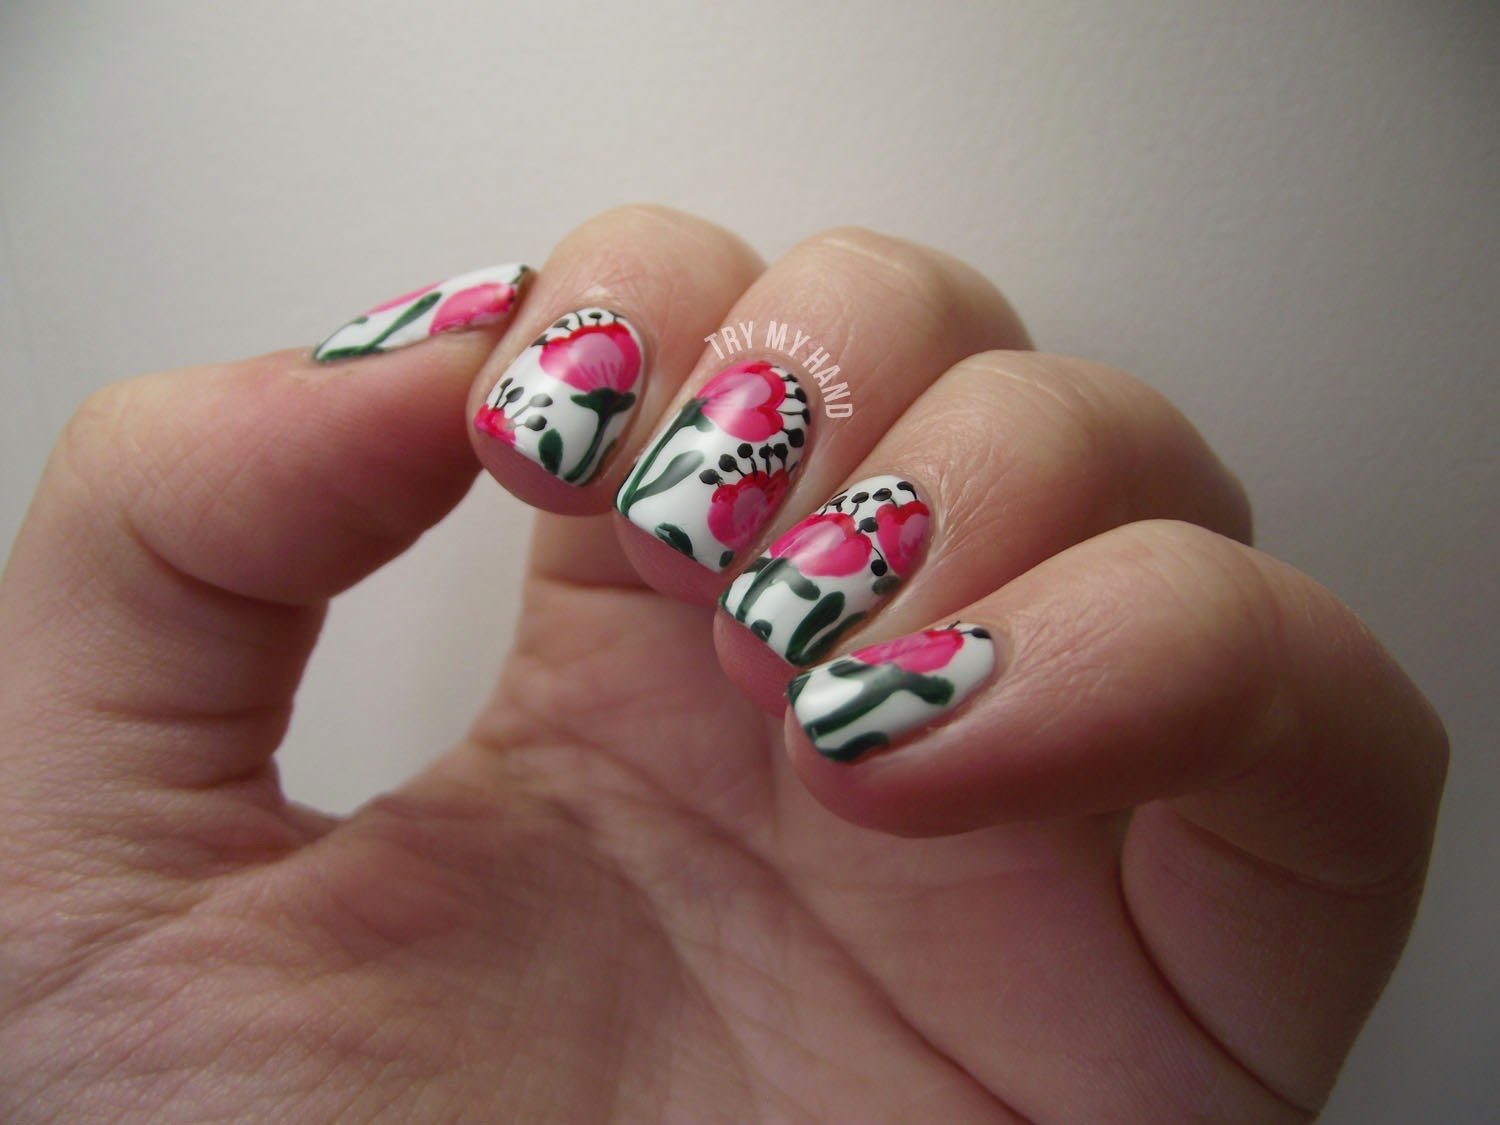
Tutorial : Rose Floral (Alphabet Nail Art Challenge)

Good evening everyone ! I'm back in Bath now and I had totally forgotten that I hadn't actually scheduled a post for today, but luckily I prepared the tutorial image the other day while I was still in Salzburg ! I start back at uni tomorrow so I don't know how often I'll be posting anymore, but I will still do my best to post whenever I can ! Obviously I won't be stopping painting my nails, but work has to come first and so I'll just have to wait and see what I'm able to fit in ! My nails need painting tomorrow in any case because I've been wearing the same design for 10 (!!!!!) days now, and my nails have grown so much it just looks weird with loads of bare nail near the cuticles !

Anyway, today I've got the final tutorial of this marathon weekend of step-by-step designs for you, and it's another one of the popular designs from the Alphabet Nail Art Challenge,  for which a lot of people asked for a tutorial ! Today's tutorial is for the "F for Floral" design, the one with the roses, it's a very abstract way of painting them, just using quite a lot of different colours to add depth to the flowers, so it's not too difficult at all ! Here's a quick photo reminder of the design :


So here's the tutorial for this design, you can use whatever colour scheme you want of course !


1. Start with your choice of base colour. I used OPI My Vampire is Buff.
2. Use a nail art brush with your darkest coloured nail polish from your colour scheme to paint on some round blobs with some frilly bits around the edges. I used OPI Dim Sum Plum.
3. Using one of the other colours from your choice of nail polishes, add some lines to the frilly blobs with a nail art brush. I used OPI Strawberry Margerita (very subtle).
4. Do the same again with another colour. I used OPI Sparrow Me the Drama.
5. And again with your lightest colour. I used OPI Steady as She Rose.
6. Using your lightest green polish of choice, paint the shape you would like your leaves to be with a nail art brush. I used OPI Don't Talk Bach to Me.
7. Leave some light green around the edges, and fill in the centre of each leaf using a slightly darker green nail polish and a nail art brush. I used OPI Jade is the New Black.
8. Do the same again using your darkest green. I used OPI Live and Let Die.
9. Put some top coat on and you're all done !

I hope that you all like this tutorial, it's pretty much all about the layering to give the depth to the design, so it doesn't really matter what colours you use, just as long as you use plenty of different shades !

Saturday, 28 September 2013

Tutorial : Kitties (Alphabet Nail Art Challenge)

Hellooooo everybody ! So I should be back in the UK by now, but as I'm staying with some friends before going back to Bath tomorrow I thought it'd be best for me to schedule a post for today ! I've got another tutorial today for you all, for a design which was really popular during the Alphabet Nail Art Challenge... it's the K for Kitties design !


Here are the steps for creating this design (obviously you can do whatever colour kitty you wish !) :


1. Paint a base colour using a very light or sheer nude nail polish shade. I used two coats of Champneys Nude.
2. Paint the head with the brush from your nail polish : make a rounded motion when painting, the same as you would do near your cuticle. Don't worry if it isn't perfect, you can always do some touch-ups with a nail art brush ! I used American Apparel Hassid.
3.Using a nail art brush, paint some ears for your kitty. I think it looks nice when their ears are quite close to the edge of your nail, so really far away from eachother !
4. Use a medium size dotting tool and some white polish to paint two eyes. Again, I like placing these quite far away from eachother, so I aim to paint them roughly under each ear ! I used American Apparel T-Shirt.
5. Paint on the insides of each ear and the white part of its nose using a nail art brush and some white nail polish.
6. Using a light pink nail polish, paint a tiny nose at the top of the white part and a line coming down from it, then add a smile ! For the nose bit, I paint it in the shape of an upside-down heart ! I used OPI Sparrow Me the Drama.
7. Add a couple of whiskers on each side with some white polish using a fine nail art brush, as well as the centres of each eye using either a nail art brush or a small dotting tool.
8. Finish with some top coat and that's it !

This is a very simple design to replicate, and it's easy to find bits and pieces around the house you can use if you don't have all the tools ! A toothpick works really well for tiny dots and fine lines, bobby pins and the balls at the end of pins you use for sewing also work well for larger dots !

If you don't own any nail tools whatsoever I would truly recommend investing in a set of different sized dotting tools - I didn't have any nail brushes for ages but my dotting tools served me really well, I even used them for painting like I would have used a nail art brush ! They're not expensive but are really worth having around if you're in to painting designs on your nails !

Friday, 27 September 2013

Tutorial : Triangles (Alphabet Nail Art Challenge)

Good afternoon everyone ! I'm writing this post early today as I'll have lots of packing to do later, so seeing as we're in the hotel room now (we went into town this morning, have been inside as it's been raining a lot this afternoon) I decided that I'd be better off posting this now ! I've got tutorials for you all the way through until Sunday, so I hope you enjoy them ! The three I'll be posting over the weekend are all for designs from the Alphabet Nail Art Challenge, and today's is from the "T for Triangles" prompt ! Here's a quick reminder of the original design :


You can choose whatever colour combinations you wish, just as long as you have 4 different colours, plus a white nail polish ! So here's what you've got to do to replicate this design :


1. Start by applying your base colour. I choose to use my lightest colour for the base as it makes painting the lines on top easier. I used two coats of OPI Steady as She Rose.
2. Use a nail art brush to paint on a random thick chunky line with your first colour across your nail. It can look however you want it to ! I used OPI Dim Sum Plum.
3. Do the same again with your second colour just over your first line. There's no need to be perfect here, it's fine to change the way your lines look ! I used OPI Can't Find my Czechbook.
4. Now do it again over the second line with your third colour. Leave a gap between your first line and then paint a new line underneath that in your same third colour. I used P2 Who Cares.
5. Carry on with the same sequence of colours until you have filled your nail.
6. Using white nail polish and a nail art brush, paint on the outline of a triangle which will be your chevron. I do this by looking at my nail and just making a little dot as a marker for where I want the point to be ! I used OPI My Boyfriend Scales Walls.
7. Fill it in !
8. Add some top coat, and you're all done !

If you want to do your nails like the accents on my thumb and ring fingers like in the original design, start by painting your white base, then paint on the chevron using what your base colour would have been for the other nails, in my case it was OPI Steady as She Rose. Continue by using your other colours to make your lines inside the chevron with the same sequence of colours as in the normal design. Don't worry if you go over the edges, as you can always go over the sides with your white polish to make it neat again !

So as you can see this isn't really so much a triangles design as it is a stripes and chevron design, but I've named it my "triangles tutorial" as that was what the original title was ! I really hope you've enjoyed this tutorial, and stay tuned for more over the next couple of days !

Thursday, 26 September 2013

Helen Dardik Week : Swan Song

Evening all ! The weather has been pretty miserable today here in Salzburg, so we stayed in for a few hours this afternoon, but still went out in to town this morning ! There was an amazing farmers' market we had no idea about, which was selling all sort of amazing food - mainly cheese and meat, but there were loads of vegetable stores and pretty autumnal floral wreaths on stands - it was just so colourful ! We fought the rain for a while and did a bit of shopping in the old town and then we went for a coffee (a hot chocolate in my case !), where my mum had a very nice looking slice of Black Forest gateau !

Today is the last day of my Helen Dardik Week series, and it's going out with a bang ! It seems appropriate that the title of this pattern is "Swan Song", since this is the final design in the series ! This is the design that is on a par in first place with the design I posted yesterday, although my mum has admitted that this is her favourite !


When I chose to replicate this pattern I was originally set on painting the swans, the flowers, however, ended up really catching my eye and, knowing me, I of course went down the floral route ! The two different beige nail polishes I've used for this design aren't as contrasted as they are in the original pattern, but I do like the subtlety of it ! I added the tiny flowers on at the end because I thought the design needed something more than just the big flowers, and I really think the orangey centres bring this design to life !


I started with two coats of OPI My Vampire is Buff for this design and then painted the big black stamens with American Apparel Hassid. The petals were done using OPI Did You 'Ear About Van Gogh, with little accents of American Apparel T-Shirt on the ends and in the black parts. The little flowers were done using American Apparel Hassid and Essie Meet Me at Sunset.


So what do you all think then ? Which design has been your favourite from this week ? I'm glad I was able to wear this design for a couple of days before having to change it, as it was the last design I painted for this series when I was preparing it all back at the beginning/middle of the month ! I'm still torn as to which design is my favourite between this one and yesterday's design !

I need to go and get ready for bed now, but I'll be back again tomorrow, this time with a new tutorial for you all ! See you then !

Wednesday, 25 September 2013

Helen Dardik Week : Botanical Fantasy

Hey there guys ! So today has been a very eventful day - we caught the train to go to Vienna for the day (well it only ended up being about 6 hours, but it was still very very very fun) ! I thought it was very similar to Prague (except here I could actually understand the language), as a lot of the old architecture was still amazingly in tact, plus the fact that it pretty much every building had a unique characteristic about it ! I'd definitely go back again - there's so much to do there that we obviously weren't able to do due to time retraints, the only problem was that it was very very expensive there !

We're moving on to my final two designs in the Helen Dardik Week series, and I've got my two favourites left to show you still ! I'm not sure I could choose which one is my true favourite, so I've decided that they're both joint first place ! Today's design is inspired by Helen Dardik's "Botanical Fantasy" pattern, which is probably my favourite of all of them !


There are so many flowers on the original patterns that I could have chosen for this design, but I decided that all the bigger ones were quite similar to other flowers I chosen previously for this series' nail designs so in the end I went for one of the smaller, less noticeable flowers. You can actually spot them quite easily in all of the original patterns, but I think it's usually the bigger ones that initially catch your eye !


For this design I started with two coats of OPI My Vampire is Buff, then for the flowers I used OPI Planks A Lot, OPI Funky Dunkey, OPI You Don't Know Jacques, P2 Hug Me and P2 Summer to Go. The leaves were done with the usual OPI Mermaids Tears and OPI Jade is the New Black. I'm glad I chose to do this colour combination, with the two different purples, although I do like the alternative reddish/pink combination in one of the other pictures of the pattern !


All in all this is definitely right up there with some of my favourite designs ever - I really love the way each nail is different but still the same ! This is a type of floral design I would do again, the combination of the light and dark shades for the petals is really nice in my opinion ! What do you all think ?

Time for bed again now, we were up super early (although I spent most of our time on the train sleeping) and I'm really tired now ! Night night everyone, see you same time tomorrow for the final design in my Helen Dardik series ! Byeeeeeee !

Tuesday, 24 September 2013

Helen Dardik Week : Summer Gardens

Hello everybody ! I need to do this post really quickly as I still need to dry my hair before going to bed - we're getting up really early tomorrow to catch a train to Vienna for the day ! Today we took a cable car up to Untersberg, a 1,973m high moutain right on the border between Austria and Germany ! There were some really amazing views, looking way out over the Alps and also back down on to the city of Salzburg.

I've got probably my least favourite of the designs I've done for my Helen Dardik Week to show you today, it's still an OK design, I just prefer all of the others I've done ! Today's design is inspired by the "Summer Gardens" pattern from August this year.


Looking back at the original inspiration-image, I sort of regret not having done one of the other flowers that feature in it. There are loads of different flowers on there that I could have chosen, but then I suppose my flowers do look okay in comparison to the original look of them on the pattern !


So I started with a base of OPI My Vampire is Buff for this design, then I moved on to painting the flowers using OPI Big Apple Red, OPI Sparrow Me the Drama, American Apparel Office and Butter London Royal Navy. For the leaves I used (I'm pretty sure) OPI Mermaids Tears and OPI Jade is the New Black. There's also, if you look very closely, some little white teardrops that I painted on as they're in the pattern, but you can't really see them very well at all ! I think it's the navy blue stamens on this one that ruin the look - they look really dainty on the original pattern but on my nails I just think they look a bit "meh" !


So that's it for today ! I'm going to go and dry my hair and then go to sleep ! I'm so worn out from all that walking I've been doing today ! But don't worry, I'll be back again tomorrow, and there are only two designs left which are both my favourites of all the designs I've done this week, so don't miss out ! Byeeeee !

Monday, 23 September 2013

Helen Dardik Week : Joyous Bloom

Hey there everyone ! Today in Salzburg we went on the Sound of Music tour ! It's probably my mum's favourite film of all time, so retracing the locations where different scenes were filmed was an obvious must-do for this holiday ! We already saw the gardens and steps/fountains where they sand "Do Re Mi" (for those who have seen the film), but today's tour took us to see the pavilion where they sing "16 Going on 17", the lake where they fell out of the boat and the church where they get married, very eventful ! We also saw some absolutely stunning views from driving up through all the mountains and in to the lake district !

Today I've got another installment in the Helen Dardik designs, this one is probably up there with my favourites, maybe third place behind two of which I've still got to show you ! This particular design is inspired by the "Joyous Bloom" pattern, but I've reverted to only doing one of the flowers from the huge amount there is to choose from !


The background colour I chose from the final picture of the patterns in the link to Helen Dardik's blog, I thought it made a change from the usual light off-white/beigey colour I've used for almost every pattern this week ! I improvised with the leaves a bit, not wanting to do anything fancy but then not wanting to leave it plain - I chose instead to add some simple leaves and stems to each flower for that extra bit of colour it gives !


So for this floral nail design I started with a base of OPI Skull and Glossbones, then the flowers were done using OPI Funky Dunkey, OPI Sparrow Me the Drama, OPI Big Apple Red and OPI My Vampire is Buff (I think, for the little stamen dots), then for the leaves and stems I used OPI Don't Talk Bach to Me. I was surprised to see how well the green leaves came though, and I thought it might be alright just to do leaves on a couple of nails, but I'm glad I did something to each nail !


I think the bright colourful folowers really stand out against the dull grey background, and I especially love the huge purple stamens - it reminds me of the red floral nails I did witht the huge centres, I think they look awesome !

Time for me to get ready for bed again ! Time flies when you're having fun ! Stayed tuned for tomorrow's nails ! See ya then !

Sunday, 22 September 2013

Helen Dardik Week : Botanical Asylum

Hellooooooo everybody ! We've just come back from a very nice dinner at the Mozartplatz, both my mum and I had beef broth with a cheese dumpling to start and then pork wiener schnitzel with potatoes and salad - very yummy ! We did our own little walking tour around Salzburg today, lots of walking up and down steps and slopes so our legs are seriously knackered now !

I've got another Helen Dardik nail design for you today, inspired by her "Botanical Asylum" pattern. I ended up going for the colour scheme on the right of the last picture on that link, as I thought the light blue colour worked really well as a background, and I preferred the way they all went together.


This design probably took me the longest out of all of the designs I'm going to show you for this Helen Dardik series, mainly because I decided to do a completely different look on each nail ! My favourite part of this design is definitely the little white mistletoe type leaves that you can see at the tip of my index nail and at the cuticle end of my ring finger.


I started off with a base of OPI Can't Find My Czechbook, and then the flowers and leaves were all done using American Apparel T-Shirt, China Glaze Man Hunt, OPI Big Apple Red and OPI Sparrow Me the Drama. I think this design is probably more impressive when you look at it at the same time as the pattern it's inspired by, as you can see where all the different bits came from on the actual pattern !


So what do you all think ? Do you enjoy making your nails all completely different in one same design or do you find it takes too long to do ? I really like the way it all ties together, but then again I do love it when they all properly match !

I need to go and dry my hair now before I go to sleep, so I'll see you all again, same time tomorrow !

Saturday, 21 September 2013

Helen Dardik Week : Butterflies Dipped in Eggplant

Guten Abend everyone ! We landed safely in Salzburg this morning after an incredibly early flight and an awfully bad night's sleep at the hotel, so I'm going get this post up as quickly as possible so that I can get some beauty sleep before doing some tourist-y stuff tomorrow ! There's the Saint Rupert's Fair on here at the moment, my mum and I had no idea about it so that was a pleasant surprise ! There were loads of men, women and children dressed in the traditional Lederhosen and Dirndls which look absolutely stunning ! It's so nice to see people all dressed up, and it all fits the scenery so well !

In other news, it's the second day of my Helen Dardik Week series and I've steered away from the florals for this one (spoiler : it's the only design this week that isn't a floral) ! The butterflies in this "Dipped in Eggplant" pattern really caught my eye, and they are quite easy to paint as well !


I hadn't actually noticed the title of this pattern until after I was sorting out what the post titles for each pattern were called that I realised that Helen Dardik had used an eggplant colour for her butterfly. I had already finished the manicure and taken all the photos when I realised that I had painted the butterflies with navy blue instead of deep purple, but I still like it ! I can't help but wonder what it would have looked like had I used an eggplant shade though !


I started with two coats of OPI My Vampire is Buff for the base. The butterflies were all done with the following colours : Butter London Royal Navy, P2 Hug Me, OPI Sparrow Me the Drama, OPI Dim Sum Plum, OPI Big Apple Red and American Apparel Office. I added the little dots in between all the little butterflies with OPI Did You Ear About Van Gogh, a colour which I haven't used in absolutely ages, mainly because it's gone thick and gloopy and I need to buy some nail polish thinner !


I think that this is a really sweet nail art design, it's the first time I've painted butterflies on my nails and it makes a nice change from the monarch butterfly wing nails you see around a lot ! What do you all think ?

Right ! Well I'm going to go and get ready for bed now as I'm super tired and apparently the nap I had this afternoon doesn't want to keep me going for much longer ! See you tomorrow everyone !

Friday, 20 September 2013

Helen Dardik Week : The Smell of Summer

Good evening everyone ! So I'm currently sitting in bed in a Premier Inn near to Gatwick airport where I'm staying the night with my mum before we head off (incredibly early) tomorrow morning to catch our flight to Salzburg ! I had literally no time left before we left France on Tuesday to schedule more than 2 posts for you, so the laptop is coming with me Austria so that I am able to keep you up-to-date every day with all the nail designs I've prepared !

I've decided to do a "Helen Dardik Week", inspired by an awesome illustrator who has done loaaaaaads of different patterns and prints on her blog. You may remember the Helen Dardik Red Flowers design I did last week, and it was those nails that inspired me to carry on with these amazing patterns ! I've got a whole seven days of these designs to show you over the next week, some of which I really really fell in love with, and I'll be showing you the first of those today !


Today's flowers are inspired by a pattern called "The Smell of Summer", which looks quite similar to the pattern I drew inspiration from for my red floral last week. These nails took quite a while to do, mainly because I was procrastinating at the time, but even if I hadn't have been procrastinating it still would have taken a long time !


So I started with a base of OPI My Boyfriend Scales Walls, then for the petals I used OPI Strawberry Margerita, OPI Sparrow Me the Drama and OPI Big Apple Red, with American Apparel Hassid for the little stamens. For the stems I used American Apparel Hunter, and it could have done with some extra shading really but I'd lost interest by that point and couldn't be bothered to add anything more to it !


And that's it ! I do like these nails and I was sad to take them off, especially as they'd taken me such a long time to do them. At least it's a new type of flower I've never painted before which was a challenge ! Definitely not my usual floral shapes ! What do you all think ?

I need to dry my hair now and then go to bed, need an early night before my alarm goes off at an incredibly antisocial time in the morning ! Night night, see you all again tomorrow !
Related Posts Plugin for WordPress, Blogger...