Good evening everyone ! I'm back in Bath now and I had totally forgotten that I hadn't actually scheduled a post for today, but luckily I prepared the tutorial image the other day while I was still in Salzburg ! I start back at uni tomorrow so I don't know how often I'll be posting anymore, but I will still do my best to post whenever I can ! Obviously I won't be stopping painting my nails, but work has to come first and so I'll just have to wait and see what I'm able to fit in ! My nails need painting tomorrow in any case because I've been wearing the same design for 10 (!!!!!) days now, and my nails have grown so much it just looks weird with loads of bare nail near the cuticles !
Anyway, today I've got the final tutorial of this marathon weekend of step-by-step designs for you, and it's another one of the popular designs from the Alphabet Nail Art Challenge, for which a lot of people asked for a tutorial ! Today's tutorial is for the "F for Floral" design, the one with the roses, it's a very abstract way of painting them, just using quite a lot of different colours to add depth to the flowers, so it's not too difficult at all ! Here's a quick photo reminder of the design :
So here's the tutorial for this design, you can use whatever colour scheme you want of course !
1. Start with your choice of base colour. I used OPI My Vampire is Buff.
2. Use a nail art brush with your darkest coloured nail polish from your colour scheme to paint on some round blobs with some frilly bits around the edges. I used OPI Dim Sum Plum.
3. Using one of the other colours from your choice of nail polishes, add some lines to the frilly blobs with a nail art brush. I used OPI Strawberry Margerita (very subtle).
4. Do the same again with another colour. I used OPI Sparrow Me the Drama.
5. And again with your lightest colour. I used OPI Steady as She Rose.
6. Using your lightest green polish of choice, paint the shape you would like your leaves to be with a nail art brush. I used OPI Don't Talk Bach to Me.
7. Leave some light green around the edges, and fill in the centre of each leaf using a slightly darker green nail polish and a nail art brush. I used OPI Jade is the New Black.
8. Do the same again using your darkest green. I used OPI Live and Let Die.
9. Put some top coat on and you're all done !
I hope that you all like this tutorial, it's pretty much all about the layering to give the depth to the design, so it doesn't really matter what colours you use, just as long as you use plenty of different shades !
Showing posts with label nail art challenge. Show all posts
Sunday, 29 September 2013
Saturday, 28 September 2013
Tutorial : Kitties (Alphabet Nail Art Challenge)
Hellooooo everybody ! So I should be back in the UK by now, but as I'm staying with some friends before going back to Bath tomorrow I thought it'd be best for me to schedule a post for today ! I've got another tutorial today for you all, for a design which was really popular during the Alphabet Nail Art Challenge... it's the K for Kitties design !
Here are the steps for creating this design (obviously you can do whatever colour kitty you wish !) :
1. Paint a base colour using a very light or sheer nude nail polish shade. I used two coats of Champneys Nude.
2. Paint the head with the brush from your nail polish : make a rounded motion when painting, the same as you would do near your cuticle. Don't worry if it isn't perfect, you can always do some touch-ups with a nail art brush ! I used American Apparel Hassid.
3.Using a nail art brush, paint some ears for your kitty. I think it looks nice when their ears are quite close to the edge of your nail, so really far away from eachother !
4. Use a medium size dotting tool and some white polish to paint two eyes. Again, I like placing these quite far away from eachother, so I aim to paint them roughly under each ear ! I used American Apparel T-Shirt.
5. Paint on the insides of each ear and the white part of its nose using a nail art brush and some white nail polish.
6. Using a light pink nail polish, paint a tiny nose at the top of the white part and a line coming down from it, then add a smile ! For the nose bit, I paint it in the shape of an upside-down heart ! I used OPI Sparrow Me the Drama.
7. Add a couple of whiskers on each side with some white polish using a fine nail art brush, as well as the centres of each eye using either a nail art brush or a small dotting tool.
8. Finish with some top coat and that's it !
This is a very simple design to replicate, and it's easy to find bits and pieces around the house you can use if you don't have all the tools ! A toothpick works really well for tiny dots and fine lines, bobby pins and the balls at the end of pins you use for sewing also work well for larger dots !
If you don't own any nail tools whatsoever I would truly recommend investing in a set of different sized dotting tools - I didn't have any nail brushes for ages but my dotting tools served me really well, I even used them for painting like I would have used a nail art brush ! They're not expensive but are really worth having around if you're in to painting designs on your nails !
Here are the steps for creating this design (obviously you can do whatever colour kitty you wish !) :
1. Paint a base colour using a very light or sheer nude nail polish shade. I used two coats of Champneys Nude.
2. Paint the head with the brush from your nail polish : make a rounded motion when painting, the same as you would do near your cuticle. Don't worry if it isn't perfect, you can always do some touch-ups with a nail art brush ! I used American Apparel Hassid.
3.Using a nail art brush, paint some ears for your kitty. I think it looks nice when their ears are quite close to the edge of your nail, so really far away from eachother !
4. Use a medium size dotting tool and some white polish to paint two eyes. Again, I like placing these quite far away from eachother, so I aim to paint them roughly under each ear ! I used American Apparel T-Shirt.
5. Paint on the insides of each ear and the white part of its nose using a nail art brush and some white nail polish.
6. Using a light pink nail polish, paint a tiny nose at the top of the white part and a line coming down from it, then add a smile ! For the nose bit, I paint it in the shape of an upside-down heart ! I used OPI Sparrow Me the Drama.
7. Add a couple of whiskers on each side with some white polish using a fine nail art brush, as well as the centres of each eye using either a nail art brush or a small dotting tool.
8. Finish with some top coat and that's it !
This is a very simple design to replicate, and it's easy to find bits and pieces around the house you can use if you don't have all the tools ! A toothpick works really well for tiny dots and fine lines, bobby pins and the balls at the end of pins you use for sewing also work well for larger dots !
If you don't own any nail tools whatsoever I would truly recommend investing in a set of different sized dotting tools - I didn't have any nail brushes for ages but my dotting tools served me really well, I even used them for painting like I would have used a nail art brush ! They're not expensive but are really worth having around if you're in to painting designs on your nails !
Friday, 27 September 2013
Tutorial : Triangles (Alphabet Nail Art Challenge)
Good afternoon everyone ! I'm writing this post early today as I'll have lots of packing to do later, so seeing as we're in the hotel room now (we went into town this morning, have been inside as it's been raining a lot this afternoon) I decided that I'd be better off posting this now ! I've got tutorials for you all the way through until Sunday, so I hope you enjoy them ! The three I'll be posting over the weekend are all for designs from the Alphabet Nail Art Challenge, and today's is from the "T for Triangles" prompt ! Here's a quick reminder of the original design :
You can choose whatever colour combinations you wish, just as long as you have 4 different colours, plus a white nail polish ! So here's what you've got to do to replicate this design :
1. Start by applying your base colour. I choose to use my lightest colour for the base as it makes painting the lines on top easier. I used two coats of OPI Steady as She Rose.
2. Use a nail art brush to paint on a random thick chunky line with your first colour across your nail. It can look however you want it to ! I used OPI Dim Sum Plum.
3. Do the same again with your second colour just over your first line. There's no need to be perfect here, it's fine to change the way your lines look ! I used OPI Can't Find my Czechbook.
4. Now do it again over the second line with your third colour. Leave a gap between your first line and then paint a new line underneath that in your same third colour. I used P2 Who Cares.
5. Carry on with the same sequence of colours until you have filled your nail.
6. Using white nail polish and a nail art brush, paint on the outline of a triangle which will be your chevron. I do this by looking at my nail and just making a little dot as a marker for where I want the point to be ! I used OPI My Boyfriend Scales Walls.
7. Fill it in !
8. Add some top coat, and you're all done !
If you want to do your nails like the accents on my thumb and ring fingers like in the original design, start by painting your white base, then paint on the chevron using what your base colour would have been for the other nails, in my case it was OPI Steady as She Rose. Continue by using your other colours to make your lines inside the chevron with the same sequence of colours as in the normal design. Don't worry if you go over the edges, as you can always go over the sides with your white polish to make it neat again !
So as you can see this isn't really so much a triangles design as it is a stripes and chevron design, but I've named it my "triangles tutorial" as that was what the original title was ! I really hope you've enjoyed this tutorial, and stay tuned for more over the next couple of days !
You can choose whatever colour combinations you wish, just as long as you have 4 different colours, plus a white nail polish ! So here's what you've got to do to replicate this design :
1. Start by applying your base colour. I choose to use my lightest colour for the base as it makes painting the lines on top easier. I used two coats of OPI Steady as She Rose.
2. Use a nail art brush to paint on a random thick chunky line with your first colour across your nail. It can look however you want it to ! I used OPI Dim Sum Plum.
3. Do the same again with your second colour just over your first line. There's no need to be perfect here, it's fine to change the way your lines look ! I used OPI Can't Find my Czechbook.
4. Now do it again over the second line with your third colour. Leave a gap between your first line and then paint a new line underneath that in your same third colour. I used P2 Who Cares.
5. Carry on with the same sequence of colours until you have filled your nail.
6. Using white nail polish and a nail art brush, paint on the outline of a triangle which will be your chevron. I do this by looking at my nail and just making a little dot as a marker for where I want the point to be ! I used OPI My Boyfriend Scales Walls.
7. Fill it in !
8. Add some top coat, and you're all done !
If you want to do your nails like the accents on my thumb and ring fingers like in the original design, start by painting your white base, then paint on the chevron using what your base colour would have been for the other nails, in my case it was OPI Steady as She Rose. Continue by using your other colours to make your lines inside the chevron with the same sequence of colours as in the normal design. Don't worry if you go over the edges, as you can always go over the sides with your white polish to make it neat again !
So as you can see this isn't really so much a triangles design as it is a stripes and chevron design, but I've named it my "triangles tutorial" as that was what the original title was ! I really hope you've enjoyed this tutorial, and stay tuned for more over the next couple of days !
Tuesday, 3 September 2013
Alphabet Nail Art Challenge : Z for Zebra
Helloooooooo everyone ! So it's the final theme today for the last letter in the alphabet, and today it's "Z for Zebra". It doesn't feel like it's been a month (including the 4 day gap when I went on holiday to Brittany) since I started this challenge as it's gone really quickly ! I'm going out with a bang with today's design though, so here it is !
I've done zebra print once before but that was a long time ago, waaaay before I started blogging and sharing photos on here and to be honest it really didn't look that great and I found it quite difficult to paint ! I loved the zebra print stamp on the Konad M-57 plate but I've gone off stamping recently and so I decided that I really needed to try doing it freehand again and I'm so glad I did !
I started with a base of OPI Can't Find My Czechbook, which I left to dry completely before starting my gradient (to avoid getting annoying bits of make-up sponge on my nails) using OPI Planks A Lot and OPI Suzi's Hungary Again, and I used black acrylic paint to do the zebra stripes. The rough effect of the stripes were done by doing a "dabbing" effect with my nail art brush when painting on the acrylic, which I think really adds to the whole look !
I did think about maybe doing the stripes in white to make a bigger contrast with the gradient background, but I'm glad I stuck to the black because it really does look good in my opinion ! I even did both hands, I'm glad I'll be able to keep my designs on for a bit longer than 24 hours for a while now as there were several days during this challenge when I would have loved to keep the design on !
Right, it's getting late now and I'm heading off to Ikea tomorrow so I'm going to go to bed to make sure I get plenty of sleep ! Goodnight everyone !
I've done zebra print once before but that was a long time ago, waaaay before I started blogging and sharing photos on here and to be honest it really didn't look that great and I found it quite difficult to paint ! I loved the zebra print stamp on the Konad M-57 plate but I've gone off stamping recently and so I decided that I really needed to try doing it freehand again and I'm so glad I did !
I started with a base of OPI Can't Find My Czechbook, which I left to dry completely before starting my gradient (to avoid getting annoying bits of make-up sponge on my nails) using OPI Planks A Lot and OPI Suzi's Hungary Again, and I used black acrylic paint to do the zebra stripes. The rough effect of the stripes were done by doing a "dabbing" effect with my nail art brush when painting on the acrylic, which I think really adds to the whole look !
I did think about maybe doing the stripes in white to make a bigger contrast with the gradient background, but I'm glad I stuck to the black because it really does look good in my opinion ! I even did both hands, I'm glad I'll be able to keep my designs on for a bit longer than 24 hours for a while now as there were several days during this challenge when I would have loved to keep the design on !
Right, it's getting late now and I'm heading off to Ikea tomorrow so I'm going to go to bed to make sure I get plenty of sleep ! Goodnight everyone !
Labels:
alphabet nail art challenge,
animal print,
gradient,
nail art,
nail art challenge,
stripes,
zebra
Monday, 2 September 2013
Alphabet Nail Art Challenge : Y for Yin Yang
Hey there everyone ! So I'm here with the penultimate post in the Alphabet Nail Art Challenge and today's theme is "Y for Yin Yang", and I really need to get a move on and write this before it's too late and not today anymore ! I really need to stop all this procrastination ! Anyway, here are the nails !
I had the idea of doing the yin yang symbol on all of my nails but got bored of that idea pretty quickly and decided to go with something else. I considered doing different black and white looks on each nail and I think that could have looked good, but I didn't want to distract from the main theme which is yin and yang and so ended up settling with some black and white glitter !
The yin yang nails were done using a base of American Apparel T-Shirt and then black acrylic paint, the shape was surprisingly easy to paint on once I'd decided what I wanted it to look like ! For the other nails I used OPI Can't Find my Czechbook (love this blue) and 17 Monochrome. I now have 3 black and white glitters that I have acquired since May, and this is the only one with bar glitter ! I really like how it looks, it's probably my favourite of the B&W glitters I have !
Right, I'm going to watch Dexter for a bit and then I'm off to bed ! I'll see you all tomorrow for the final theme in the challenge : zebra ! I'm actually quite looking forward to that theme so we'll see what I come up with ! Byeeeeee !
I had the idea of doing the yin yang symbol on all of my nails but got bored of that idea pretty quickly and decided to go with something else. I considered doing different black and white looks on each nail and I think that could have looked good, but I didn't want to distract from the main theme which is yin and yang and so ended up settling with some black and white glitter !
The yin yang nails were done using a base of American Apparel T-Shirt and then black acrylic paint, the shape was surprisingly easy to paint on once I'd decided what I wanted it to look like ! For the other nails I used OPI Can't Find my Czechbook (love this blue) and 17 Monochrome. I now have 3 black and white glitters that I have acquired since May, and this is the only one with bar glitter ! I really like how it looks, it's probably my favourite of the B&W glitters I have !
Right, I'm going to watch Dexter for a bit and then I'm off to bed ! I'll see you all tomorrow for the final theme in the challenge : zebra ! I'm actually quite looking forward to that theme so we'll see what I come up with ! Byeeeeee !
Sunday, 1 September 2013
Alphabet Nail Art Challenge : X for XOXO
Good evening everyone ! Now I'm a bit disappointed with today's nail art as it's a bit boring, but I'm feeling uninspired since the frustration with my watermarbling yesterday, I'm quite looking forward to this challenge being over and done with soon and being able to have a break from nail art for a bit ! Perhaps I'll do some swatching after that as a sort of "palette cleaser" !
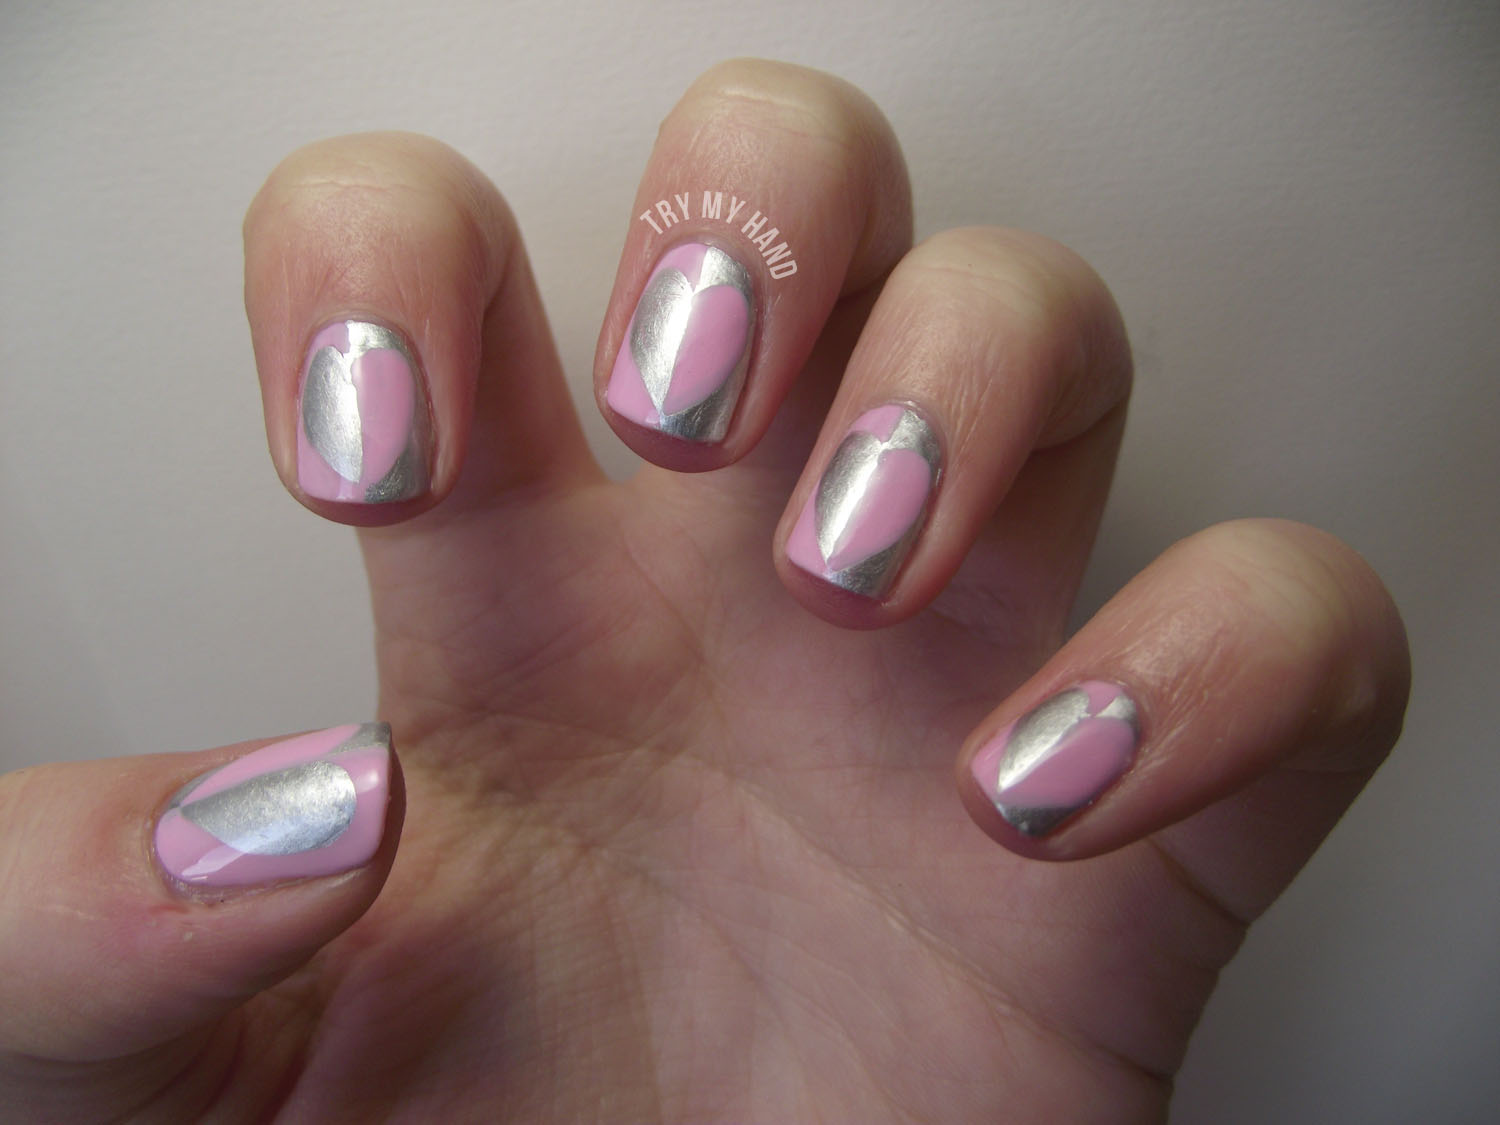
See what I mean ? I love the half hearts design and everything, but the colours I chose are just... bleh ! I wanted to write "xoxo" on a couple of my nails, but that didn't really work with the size of letters I wanted to do so I just went with the hearts. I should have really chosen a darker pink colour instead of the light one, or if I'd have paired the light pink with a dark pink that would have been fine, I don't know why I didn't just do that but hey ho, it's done now !
The pink I used was an unamed Color Club polish and the silver was Barry M Silver Foil. I don't know whether it's just me but my Gold Foil polish seems to be a lot more opaque than its silver counterpart, have any of you noticed this if you own these polishes ?
Right well that's all I have to say about this design really, it's nothing special, here's hoping I come up with something slightly better for tomorrow's ying yang theme ! I'm off to bed now as I'm really tired, perhaps a good night's sleep will help with my nail-art-uninspiration ! See you then !
See what I mean ? I love the half hearts design and everything, but the colours I chose are just... bleh ! I wanted to write "xoxo" on a couple of my nails, but that didn't really work with the size of letters I wanted to do so I just went with the hearts. I should have really chosen a darker pink colour instead of the light one, or if I'd have paired the light pink with a dark pink that would have been fine, I don't know why I didn't just do that but hey ho, it's done now !
The pink I used was an unamed Color Club polish and the silver was Barry M Silver Foil. I don't know whether it's just me but my Gold Foil polish seems to be a lot more opaque than its silver counterpart, have any of you noticed this if you own these polishes ?
Right well that's all I have to say about this design really, it's nothing special, here's hoping I come up with something slightly better for tomorrow's ying yang theme ! I'm off to bed now as I'm really tired, perhaps a good night's sleep will help with my nail-art-uninspiration ! See you then !
Saturday, 31 August 2013
Alphabet Nail Art Challenge : W for Watermarble
Okay... I'll just go ahead and take back anything nice I have previously said about watermarbling. I can't believe I actually started to look forward to trying this technique out again, as after today's attempt(s) I don't think I'll even be remotely interested in doing a watermarble design for a long long long long time ! I'm relatively happy with the final outcome, but all the fuss and time it took to actually do it is soooo not worth it !
I initially wanted to combine two different purples, one creme and one shimmer, but that didn't work. So I then moved on to the idea idea but with blue polishes and guess what, that didn't work either. I then trolled through all of my collection to try to find polishes that would work, as only the Essie ones I had seemed to be working but of course my last watermarble was done using all Essie, and I wanted something different ! Ugh the choices we have to make !
So I started with a base of American Apparel T-Shirt, to make sure all the colour on top would show up properly, as is recommended by all the good watermarblers out there ! The two colours I used for the actual watermarbling were Catrice Aretha's R.E.S.P.I.N.K and Essie Mint Candy Apple. You can't actually tell that I used Mint Candy Apple as it just looks white on the design, I suppose because it must have been too sheer but oh well I don't mind, I'm just glad it worked ! I suppose it's just as well that the pink was nice and opaque otherwise we wouldn't hae had any design at all !
So that's it for today... it's alright I suppose, I'm just annoyed about how long it took and how much nail polish I must have wasted on all the unsuccessful attempts ! Maybe I'll get better at it one day, but for the moment I'm going steer well clear of it !
I'll see you all tomorrow for the "X for XOXO" theme, perhaps I'll do something nice and simple, although I have had an idea for it since the beginning !
I initially wanted to combine two different purples, one creme and one shimmer, but that didn't work. So I then moved on to the idea idea but with blue polishes and guess what, that didn't work either. I then trolled through all of my collection to try to find polishes that would work, as only the Essie ones I had seemed to be working but of course my last watermarble was done using all Essie, and I wanted something different ! Ugh the choices we have to make !
So I started with a base of American Apparel T-Shirt, to make sure all the colour on top would show up properly, as is recommended by all the good watermarblers out there ! The two colours I used for the actual watermarbling were Catrice Aretha's R.E.S.P.I.N.K and Essie Mint Candy Apple. You can't actually tell that I used Mint Candy Apple as it just looks white on the design, I suppose because it must have been too sheer but oh well I don't mind, I'm just glad it worked ! I suppose it's just as well that the pink was nice and opaque otherwise we wouldn't hae had any design at all !
So that's it for today... it's alright I suppose, I'm just annoyed about how long it took and how much nail polish I must have wasted on all the unsuccessful attempts ! Maybe I'll get better at it one day, but for the moment I'm going steer well clear of it !
I'll see you all tomorrow for the "X for XOXO" theme, perhaps I'll do something nice and simple, although I have had an idea for it since the beginning !
Friday, 30 August 2013
Alphabet Nail Art Challenge : V for Vintage
Good evening everyone ! We'll start here tonight by confirming that vintage is anything older than roughly 50 years old ? Okay ? So that makes 3 years of the 1960's vintage, right ? Perfect ! Glad we got that all out of the way, so now we can move on to the design ! I spent ages researching the differences between the words "antique", "vintage" and "retro" and after understanding the apparently much-debated subtleties, was able to decide on what I wanted to do on my nails !
I looked through a load of vintage patterns and wallpapers/backgrounds etc and didn't find much I liked other than a few floral designs, and I really wanted to do something other than flowers seeing as I already did the "F for Floral" theme in this challenge ! I then decided to google some 60's wallpaper patterns (we've already agreed that 3 years of that are vintage so I'm allowed !) and eventually found this design on Pinterest that I absolutely had to do !
I started with a base of OPI You Don't Know Jacques on my index, middle and little fingers, and P2 Hug Me on my thumb and ring fingers. For the circular design I used P2 Hug Me, OPI My Back Pocket, Essie Meet Me at Sunset and OPI You Don't Know Jacques. I did the stripes on the accent nails using those same colours, although I think it would have looked better with a different colour to the brown, there's just something about it !
So do you like this design as much as I do ? I love the circular gradient design, I really think it looks like real 60's kitchen wallpaper with the gross colours, there were loads of different wallpaper patterns I saw but this one really inspired me, and I'm so glad I steered clear of the floral designs for today's theme !
Tomorrow I've got to do watermarbling for the "W" theme of the challenge, and I remember saying in my post last time when I wrote about my first successful attempt at it that I was excited about trying it again, but I'm not so sure now ! I'm feeling nervous about it ! Wish me lots and lots of luck !
I looked through a load of vintage patterns and wallpapers/backgrounds etc and didn't find much I liked other than a few floral designs, and I really wanted to do something other than flowers seeing as I already did the "F for Floral" theme in this challenge ! I then decided to google some 60's wallpaper patterns (we've already agreed that 3 years of that are vintage so I'm allowed !) and eventually found this design on Pinterest that I absolutely had to do !
I started with a base of OPI You Don't Know Jacques on my index, middle and little fingers, and P2 Hug Me on my thumb and ring fingers. For the circular design I used P2 Hug Me, OPI My Back Pocket, Essie Meet Me at Sunset and OPI You Don't Know Jacques. I did the stripes on the accent nails using those same colours, although I think it would have looked better with a different colour to the brown, there's just something about it !
So do you like this design as much as I do ? I love the circular gradient design, I really think it looks like real 60's kitchen wallpaper with the gross colours, there were loads of different wallpaper patterns I saw but this one really inspired me, and I'm so glad I steered clear of the floral designs for today's theme !
Tomorrow I've got to do watermarbling for the "W" theme of the challenge, and I remember saying in my post last time when I wrote about my first successful attempt at it that I was excited about trying it again, but I'm not so sure now ! I'm feeling nervous about it ! Wish me lots and lots of luck !
Labels:
alphabet nail art challenge,
nail art,
nail art challenge,
pattern,
retro,
stripes,
vintage
Thursday, 29 August 2013
Alphabet Nail Art Challenge : U for Universe
Hello everybody ! So what do you all think of the new layout then ? I'm really excited about it and really proud of what I've come up with, it's definitely a change for the better ! Anyway, I'm writing this post rather late tonight as we've had someone over for dinner, and while I managed to fit in painting my nails this evening, I didn't manage to get my photos or post sorted, so that's why it's late tonight ! Enough rambing, on to the nails !
I was excited about doing galaxy nails for the "U for Universe" theme, but as I've already done normal galaxy nails twice before (here and here, jeez those ones from last year seem like such a long time ago, I've definitely improved !) I decided that I wanted to do something different to the usual. I've been seeing plenty of pastel galaxy nail designs floating around the web recently, notably from The Nailasaurus, but I tried looking for plain pink galaxy nails and couldn't find anything so I knew that was my calling !
I started with a base of Essie Splash of Grenadine on my fingers, and then sponged on a cocktail of different pink shades, including OPI My Very First Knockwurst, OPI Suzi's Hungary Again, OPI Dim Sum Plum, OPI Sparrow Me the Drama, OPI Steady As She Rose, as well as OPI My Boyfriend Scales Walls. I topped that with a coat of China Glaze Fairy Dust and then painted on some stars and representative spots in American Apparel T-Shirt using my nail art brush.
It's exactly the same method as I've used before for my previous galaxy nail designs, just with a different colour scheme !
So what do you all think of my pink galaxy nails ? You could do this in loads of different colours schemes, obviously, but since pink is one of my favourite colours (it's the one I have the most nail varnish shades of in any case) I think it's very fitting ! I just love galaxy nails in general really, they're so easy to do and not time consuming if you're not aiming to be particularly precise ! I do think that the Fairy Dust is a must-have though, it just adds so much depth to the whole thing !
Tomorrow's theme is vintage, and I have absolutely no idea what I'm going to do for that, so any suggestions are hugely welcomed ! Ta ta for now everyone !
I was excited about doing galaxy nails for the "U for Universe" theme, but as I've already done normal galaxy nails twice before (here and here, jeez those ones from last year seem like such a long time ago, I've definitely improved !) I decided that I wanted to do something different to the usual. I've been seeing plenty of pastel galaxy nail designs floating around the web recently, notably from The Nailasaurus, but I tried looking for plain pink galaxy nails and couldn't find anything so I knew that was my calling !
I started with a base of Essie Splash of Grenadine on my fingers, and then sponged on a cocktail of different pink shades, including OPI My Very First Knockwurst, OPI Suzi's Hungary Again, OPI Dim Sum Plum, OPI Sparrow Me the Drama, OPI Steady As She Rose, as well as OPI My Boyfriend Scales Walls. I topped that with a coat of China Glaze Fairy Dust and then painted on some stars and representative spots in American Apparel T-Shirt using my nail art brush.
It's exactly the same method as I've used before for my previous galaxy nail designs, just with a different colour scheme !
So what do you all think of my pink galaxy nails ? You could do this in loads of different colours schemes, obviously, but since pink is one of my favourite colours (it's the one I have the most nail varnish shades of in any case) I think it's very fitting ! I just love galaxy nails in general really, they're so easy to do and not time consuming if you're not aiming to be particularly precise ! I do think that the Fairy Dust is a must-have though, it just adds so much depth to the whole thing !
Tomorrow's theme is vintage, and I have absolutely no idea what I'm going to do for that, so any suggestions are hugely welcomed ! Ta ta for now everyone !
Labels:
alphabet nail art challenge,
galaxy,
glitter,
nail art,
nail art challenge,
pink
Wednesday, 28 August 2013
Alphabet Nail Art Challenge : T for Triangles
Hey there guys ! I've been busy trying to sort out my new blog layout all afternoon/evening today, and I think I'll be finishing it all up tonight hopefully, so keep an eye out for that ! I'll be sorting the major stuff out now and then doing the small tweaks in the next couple of days ! One of the major changes for the blog is that I'm contemplating changing the commenting system to Disqus, as I feel it'll be a big step towards being able to communicate properly with my followers in the comments, so let me know what you all think and your experiences with Disqus !
Anyway, I did manage to fit in some nail art today, of course, so here's today's installment in the alphabet nail art challenge !
The final result of today's design is completely different to what I had in mind last night ! I fancied doing something along the lines of this design by Very Emily, doing a pattern underneath and a geometrical triangle design on top in white. In the end I rather liked my thumb and ring finger accent nails with just a chevron so I just decided to add a white chevron on each of the other nails ! Do you think the geometric pattern on top would have looked better ?
For this design I used a base of OPI My Boyfriend Scales Walls on my thumb and ring finger, and OPI Steady as She Rose on the others. The squiggly stripes were done using OPI Dim Sum Plum, OPI Can't Find my Czechbook and P2 Who Cares, as well as Steady as She Rose. I feehanded all the chevrons as really didn't feel patient enough (I barely ever do) to use tape and while I really love the chevrons on my thumb, middle and ring fingers, I feel the ones on my index and little fingers could look better !
That's all for today, it's scary to think that this challenge is nearing to an end as it's gone so quickly ! Tomorrow is "U for Universe"...yay galaxy nails ! I'll see you all then, but in the meantime, apologies for any (if any) inconvenience the change of layouts may cause ! Hopefully it'll all going swimmingly !
Tuesday, 27 August 2013
Alphabet Nail Art Challenge : S for Sharks
Evening all ! So I'm writing this post positively early in comparison to the past few days of posts, but I won't complain ! The Great British Bake Off is on now so I'd better get a move on writing this so I'm not torn between the TV and my laptop !
Here's another theme that I wasn't particularly excited about...sharks... There's not really all that much room for creativity but hey, I did what I could ! I looked through google at posters for Jaws and just plain shark images, and I came across this stock image which I decided would be best for what I wanted to do !
I started with two coats of Essie Lapiz of Luxury on all my nails, for the shark I used black acrylic paint to get a good outline, and for the various details I used P2 Flirt With Me, OPI Skulls and Glossbones and P2 Glory. For the water splashes I used China Glaze Man Hunt, P2 Up in the Air, Models Own Blooboo and OPI My Boyfriend Scales Walls. My favourite part about this design is probably the splashes, I think it'd look great just by itself as a mani !
So what do you all think ? What would you have done for the shark theme ? It's a shame I only started this challenge when I did as I might have been able to tie the shark theme in with Shark Week, but hey ho, they're only a couple of weeks late !
I'll see you all tomorrow with the "T for Triangles" theme, I've already got an idea of what I'm going to do !
Here's another theme that I wasn't particularly excited about...sharks... There's not really all that much room for creativity but hey, I did what I could ! I looked through google at posters for Jaws and just plain shark images, and I came across this stock image which I decided would be best for what I wanted to do !
I started with two coats of Essie Lapiz of Luxury on all my nails, for the shark I used black acrylic paint to get a good outline, and for the various details I used P2 Flirt With Me, OPI Skulls and Glossbones and P2 Glory. For the water splashes I used China Glaze Man Hunt, P2 Up in the Air, Models Own Blooboo and OPI My Boyfriend Scales Walls. My favourite part about this design is probably the splashes, I think it'd look great just by itself as a mani !
So what do you all think ? What would you have done for the shark theme ? It's a shame I only started this challenge when I did as I might have been able to tie the shark theme in with Shark Week, but hey ho, they're only a couple of weeks late !
I'll see you all tomorrow with the "T for Triangles" theme, I've already got an idea of what I'm going to do !
Monday, 26 August 2013
Alphabet Nail Art Challenge : R for Rasta
Hey there everyone ! I'm trying out a new way of watermarking and presenting my photos today, ready to go with my new layout which'll be up pretty soon too ! Let me know what you all think of it ! Anyway, I wasn't particularly excited about today's theme - "R for Rasta", but here's what I came up with !
I've never really been in to the whole rasta/jamaican sort of trend, a lot of people who were at school with me were though ! I'm really happy with the way it looks though, especially as I used a design I've been wanting to try for ages : half moon + tips in different colours ! I added the marijuana leaf as it just happens to be what the red, green and yellow together makes me think of, although the one on my ring finger looks a bit more like a palm tree than a leaf !
I started with the yellow for the base using Maybelline Electric Yellow as it's the lightest colour, I then painted the green half moons with Collection 2000 Ninja and the tips with OPI Big Apple Red. I used black acrylic paint and a standard google image to paint the marijuana leaf silhouette ! So what do think of the one on my ring minger ? Palm tree or leaf ?
I don't think I'm completely won over with the whole rasta thing, but I do like the way it's turned out ! I think someone who's in to it would appreciate these nails far more than I do, so I think I'll just stick to the florals !
It's really late now, I've spent so long procrastinating since I first started writing this post about an hour ago, so I need to go to bed now ! See you all again tomorrow !
I've never really been in to the whole rasta/jamaican sort of trend, a lot of people who were at school with me were though ! I'm really happy with the way it looks though, especially as I used a design I've been wanting to try for ages : half moon + tips in different colours ! I added the marijuana leaf as it just happens to be what the red, green and yellow together makes me think of, although the one on my ring finger looks a bit more like a palm tree than a leaf !
I started with the yellow for the base using Maybelline Electric Yellow as it's the lightest colour, I then painted the green half moons with Collection 2000 Ninja and the tips with OPI Big Apple Red. I used black acrylic paint and a standard google image to paint the marijuana leaf silhouette ! So what do think of the one on my ring minger ? Palm tree or leaf ?
I don't think I'm completely won over with the whole rasta thing, but I do like the way it's turned out ! I think someone who's in to it would appreciate these nails far more than I do, so I think I'll just stick to the florals !
It's really late now, I've spent so long procrastinating since I first started writing this post about an hour ago, so I need to go to bed now ! See you all again tomorrow !
Labels:
alphabet nail art challenge,
green,
manicure,
nail art,
nail art challenge,
red,
yellow
Sunday, 25 August 2013
Alphabet Nail Art Challenge : Q for Quilt
Hey there everybody ! So I have to admit, I was feeling completely unenthusiastic about today's theme both last night and this morning, even when I'd decided what I wanted to do on my nails and sat down to do them I ended up procrastinating for another hour or so and totally delayed having to do them ! I got them done in the end though so that's all that matters, and I'm actually rather pleased with them !
I looked up "quilts" on wikipedia which came up with all sorts of different types, even "crazy quilts" which I considered, but decided that was too complicated ! In the end I searched for quilts on Pinterest and found this one which inspired me ! I didn't use the colours that were in the pinterest quilt image, and instead I chose to pick some random colours from my collection !
I used OPI My Boyfriend Scales Walls for the base colour, and the coloured triangles were done using OPI Funky Dunkey, OPI Planks A Lot, OPI Sparrow Me the Drama, OPI My Very First Knockwurst, OPI Can't Find my Czechbook, OPI Big Apple Red, OPI My Back Pocket, China Glaze Man Hunt and Essie Meet Me at Sunset. Wow.. that's a lot of nail varnish !
This design took ages for me to do, far longer than I had expected ! As you can see I started with a lot of detail and small triangles on the thumb but then as soon as I'd finished that nail, I knew the others had to have a larger pattern on them ! Just imagine the time it would have taken me otherwise !!!
I'm going to watch some more TV now before I go to bed, so I'll see you tomorrow !
I looked up "quilts" on wikipedia which came up with all sorts of different types, even "crazy quilts" which I considered, but decided that was too complicated ! In the end I searched for quilts on Pinterest and found this one which inspired me ! I didn't use the colours that were in the pinterest quilt image, and instead I chose to pick some random colours from my collection !
I used OPI My Boyfriend Scales Walls for the base colour, and the coloured triangles were done using OPI Funky Dunkey, OPI Planks A Lot, OPI Sparrow Me the Drama, OPI My Very First Knockwurst, OPI Can't Find my Czechbook, OPI Big Apple Red, OPI My Back Pocket, China Glaze Man Hunt and Essie Meet Me at Sunset. Wow.. that's a lot of nail varnish !
This design took ages for me to do, far longer than I had expected ! As you can see I started with a lot of detail and small triangles on the thumb but then as soon as I'd finished that nail, I knew the others had to have a larger pattern on them ! Just imagine the time it would have taken me otherwise !!!
I'm going to watch some more TV now before I go to bed, so I'll see you tomorrow !
Labels:
alphabet nail art challenge,
blue,
manicure,
nail art,
nail art challenge,
orange,
pattern,
pink,
purple,
red,
white
Friday, 23 August 2013
Alphabet Nail Art Challenge : O for Owls
Evening all ! I've just spent the last 30 mins deleting a load of photos from my phone as I have no storage space left ! Oh dear ! Mind you.. 7GB of photos is rather a lot to be fair ! So anyway, I seem to be procrastinating and not getting very much of this post written, so here are the nails !
So today was the first day during this challenge that I've had to stop what I was doing and get rid of everything on my nails ! I wanted to try using o-rings to create half moon designs on each nail to form the ears of the owls, but it just didn't look right after I'd applied the base colour and so just took everything off ! I'm glad I did though because I'm really happy with the end design now !
My base colour in this design is OPI You Don't Know Jacques and for the details on the owls I used Barry M Gold Foil, OPI My Back Pocket, American Apparel T-Shirt and American Apparel Hassid. I put a little white dash in each eye on the owls, I think it really brings the whole look together !
I've been busy sorting out a new layout for my blog today, so I'm going to go and do some more of that before I go to bed ! That and deleting photos ! I'm working all day tomorrow but I should hopefully have enough time before the sun sets to paint my nails and take some reasonable photos, so I'll see you then !
So today was the first day during this challenge that I've had to stop what I was doing and get rid of everything on my nails ! I wanted to try using o-rings to create half moon designs on each nail to form the ears of the owls, but it just didn't look right after I'd applied the base colour and so just took everything off ! I'm glad I did though because I'm really happy with the end design now !
My base colour in this design is OPI You Don't Know Jacques and for the details on the owls I used Barry M Gold Foil, OPI My Back Pocket, American Apparel T-Shirt and American Apparel Hassid. I put a little white dash in each eye on the owls, I think it really brings the whole look together !
I've been busy sorting out a new layout for my blog today, so I'm going to go and do some more of that before I go to bed ! That and deleting photos ! I'm working all day tomorrow but I should hopefully have enough time before the sun sets to paint my nails and take some reasonable photos, so I'll see you then !
Labels:
alphabet nail art challenge,
animal print,
brown,
gold,
hearts,
manicure,
nail art,
nail art challenge
Thursday, 22 August 2013
Alphabet Nail Art Challenge : N for Nautical
It's time for another theme in the Alphabet Nail Art Challenge everyone, and today is (as per the title) "N for Nautical" ! I think that nautical designs such as anchors and navy stripes are pretty popular in the nail art world, as well as just in general with stuff such as jewellery and tattos often being inspired by nautical symbols, so I had a lot of idea for what to do on my nails today ! Here's what I came up with :
I didn't have a very good time trying to take photos of this design with my camera so I've had to resort to using my iPhone for taking today's pictures ! Who'd have thought a mobile phone would get better photos than a normal camera ? ..something's not right there ! Have any of you ever had this problem with certain nail designs ?
I started with a base of OPI My Boyfriend Scales Walls which I applied about 3.5 hours before I started doing my nails. I was doing crochet all day so I had the patience to wait for it to dry for a bit ! I dented my thumb though with the white polish so I took that off when I got back and applied China Glaze Man Hunt instead. For the stripes I used CG Man Hunt and OPI The Spy Who Loved Me, I used Barry M Silver Foil for the anchor on my thumb and then placed a stud on each striped nail.
So what do you think of my nautical nails ? I think they're quite minimalist but in a good way, and I really love the anchor on my thumb nail ! The decision to add studs to the striped nails was a last minute one as I just thought it was lacking something ! I suppose I could have done something more complex, but I'm quite happy with what I've done !
I'm off now, so I'll see you all again tomorrow !
I didn't have a very good time trying to take photos of this design with my camera so I've had to resort to using my iPhone for taking today's pictures ! Who'd have thought a mobile phone would get better photos than a normal camera ? ..something's not right there ! Have any of you ever had this problem with certain nail designs ?
I started with a base of OPI My Boyfriend Scales Walls which I applied about 3.5 hours before I started doing my nails. I was doing crochet all day so I had the patience to wait for it to dry for a bit ! I dented my thumb though with the white polish so I took that off when I got back and applied China Glaze Man Hunt instead. For the stripes I used CG Man Hunt and OPI The Spy Who Loved Me, I used Barry M Silver Foil for the anchor on my thumb and then placed a stud on each striped nail.
So what do you think of my nautical nails ? I think they're quite minimalist but in a good way, and I really love the anchor on my thumb nail ! The decision to add studs to the striped nails was a last minute one as I just thought it was lacking something ! I suppose I could have done something more complex, but I'm quite happy with what I've done !
I'm off now, so I'll see you all again tomorrow !
Labels:
alphabet nail art challenge,
blue,
manicure,
nail art,
nail art challenge,
nautical,
red,
stripes,
studs,
white
Wednesday, 21 August 2013
Alphabet Nail Art Challenge : M for Mosaic
Hello everyone ! It feels like the day has gone seriously quickly today, perhaps because I didn't wake up until 11am this morning, I ended up not doing very much all day except for a bit of fiddling on my computer and doing my nails late this afternoon ! I'm really pleased with what I've come up with for today's mosaic theme in the nail art challenge, I hope you all like it !
I was thinking of maybe using some striping tape to make squares and just paint them all different colours but I didn't fancy the idea of waiting around for my base colours to dry before I could use the striping tape, so that idea went out the window ! Instead I settled on another freehand nail art design in a mosaic pattern, which I think looks far better than anything I could have done with striping tape !
For today's design I started by alternating base colours with OPI My Very First Knockwurst and OPI Dim Sum Plum. As well as those colours, I used OPI Sparrow Me the Drama, OPI Strawberry Margerita and OPI Planks A Lot for the mosaic pieces. I think I prefer the nails which have Dim Sum Plum for the base (index and ring) because the mosaic triangles on top look more pronounced in comparison to the other three nails, what do you reckon ?
So I may have managed to avoid using striping tape today but I don't think I'll be able to avoid it for tomorrow's nautical theme, not for what I have planned in any case ! You'll have to wait until tomorrow for that though, so I'll see you all then !
I was thinking of maybe using some striping tape to make squares and just paint them all different colours but I didn't fancy the idea of waiting around for my base colours to dry before I could use the striping tape, so that idea went out the window ! Instead I settled on another freehand nail art design in a mosaic pattern, which I think looks far better than anything I could have done with striping tape !
For today's design I started by alternating base colours with OPI My Very First Knockwurst and OPI Dim Sum Plum. As well as those colours, I used OPI Sparrow Me the Drama, OPI Strawberry Margerita and OPI Planks A Lot for the mosaic pieces. I think I prefer the nails which have Dim Sum Plum for the base (index and ring) because the mosaic triangles on top look more pronounced in comparison to the other three nails, what do you reckon ?
So I may have managed to avoid using striping tape today but I don't think I'll be able to avoid it for tomorrow's nautical theme, not for what I have planned in any case ! You'll have to wait until tomorrow for that though, so I'll see you all then !
Labels:
alphabet nail art challenge,
manicure,
nail art,
nail art challenge,
pattern,
pink,
purple,
shapes
Subscribe to:
Posts (Atom)