Showing posts with label black. Show all posts

Thursday, 26 September 2013

Helen Dardik Week : Swan Song

Evening all ! The weather has been pretty miserable today here in Salzburg, so we stayed in for a few hours this afternoon, but still went out in to town this morning ! There was an amazing farmers' market we had no idea about, which was selling all sort of amazing food - mainly cheese and meat, but there were loads of vegetable stores and pretty autumnal floral wreaths on stands - it was just so colourful ! We fought the rain for a while and did a bit of shopping in the old town and then we went for a coffee (a hot chocolate in my case !), where my mum had a very nice looking slice of Black Forest gateau !

Today is the last day of my Helen Dardik Week series, and it's going out with a bang ! It seems appropriate that the title of this pattern is "Swan Song", since this is the final design in the series ! This is the design that is on a par in first place with the design I posted yesterday, although my mum has admitted that this is her favourite !


When I chose to replicate this pattern I was originally set on painting the swans, the flowers, however, ended up really catching my eye and, knowing me, I of course went down the floral route ! The two different beige nail polishes I've used for this design aren't as contrasted as they are in the original pattern, but I do like the subtlety of it ! I added the tiny flowers on at the end because I thought the design needed something more than just the big flowers, and I really think the orangey centres bring this design to life !


I started with two coats of OPI My Vampire is Buff for this design and then painted the big black stamens with American Apparel Hassid. The petals were done using OPI Did You 'Ear About Van Gogh, with little accents of American Apparel T-Shirt on the ends and in the black parts. The little flowers were done using American Apparel Hassid and Essie Meet Me at Sunset.


So what do you all think then ? Which design has been your favourite from this week ? I'm glad I was able to wear this design for a couple of days before having to change it, as it was the last design I painted for this series when I was preparing it all back at the beginning/middle of the month ! I'm still torn as to which design is my favourite between this one and yesterday's design !

I need to go and get ready for bed now, but I'll be back again tomorrow, this time with a new tutorial for you all ! See you then !

Monday, 19 August 2013

Alphabet Nail Art Challenge : K for Kittens

Good evening all, I'm back again with another installment in the alphabet nail art challenge and as I mentioned yesterday, today's theme is kittens ! I did cat nails about this time last year and haven't done them since so I suppose this was a good opportunity to try doing them again !


The method I used for doing the cats today was the same as last year, I painted the black rounded face and then added the ears and facial features with a nail art brush - it's really easy to do ! I prefer the way the cats look today to what they did last year, I definitely think I've made progress as far as my nail art skills are concerned !


I started with two coats of Champneys Nude just to make the nail look nice, then I used American Apparel Hassid, Americal Apparel T-Shirt and OPI Sparrow Me the Drama for the little kitties. I like the cartoony look for the cats, it's much more my style than the (sort of) realistic-looking cats !


So what do you all think of my kitties ? I really really like them, and I think if I ever decide to do cats again in the future I'll paint them like this ! They're just too cute !

See you all again tomorrow everyone !

Wednesday, 7 August 2013

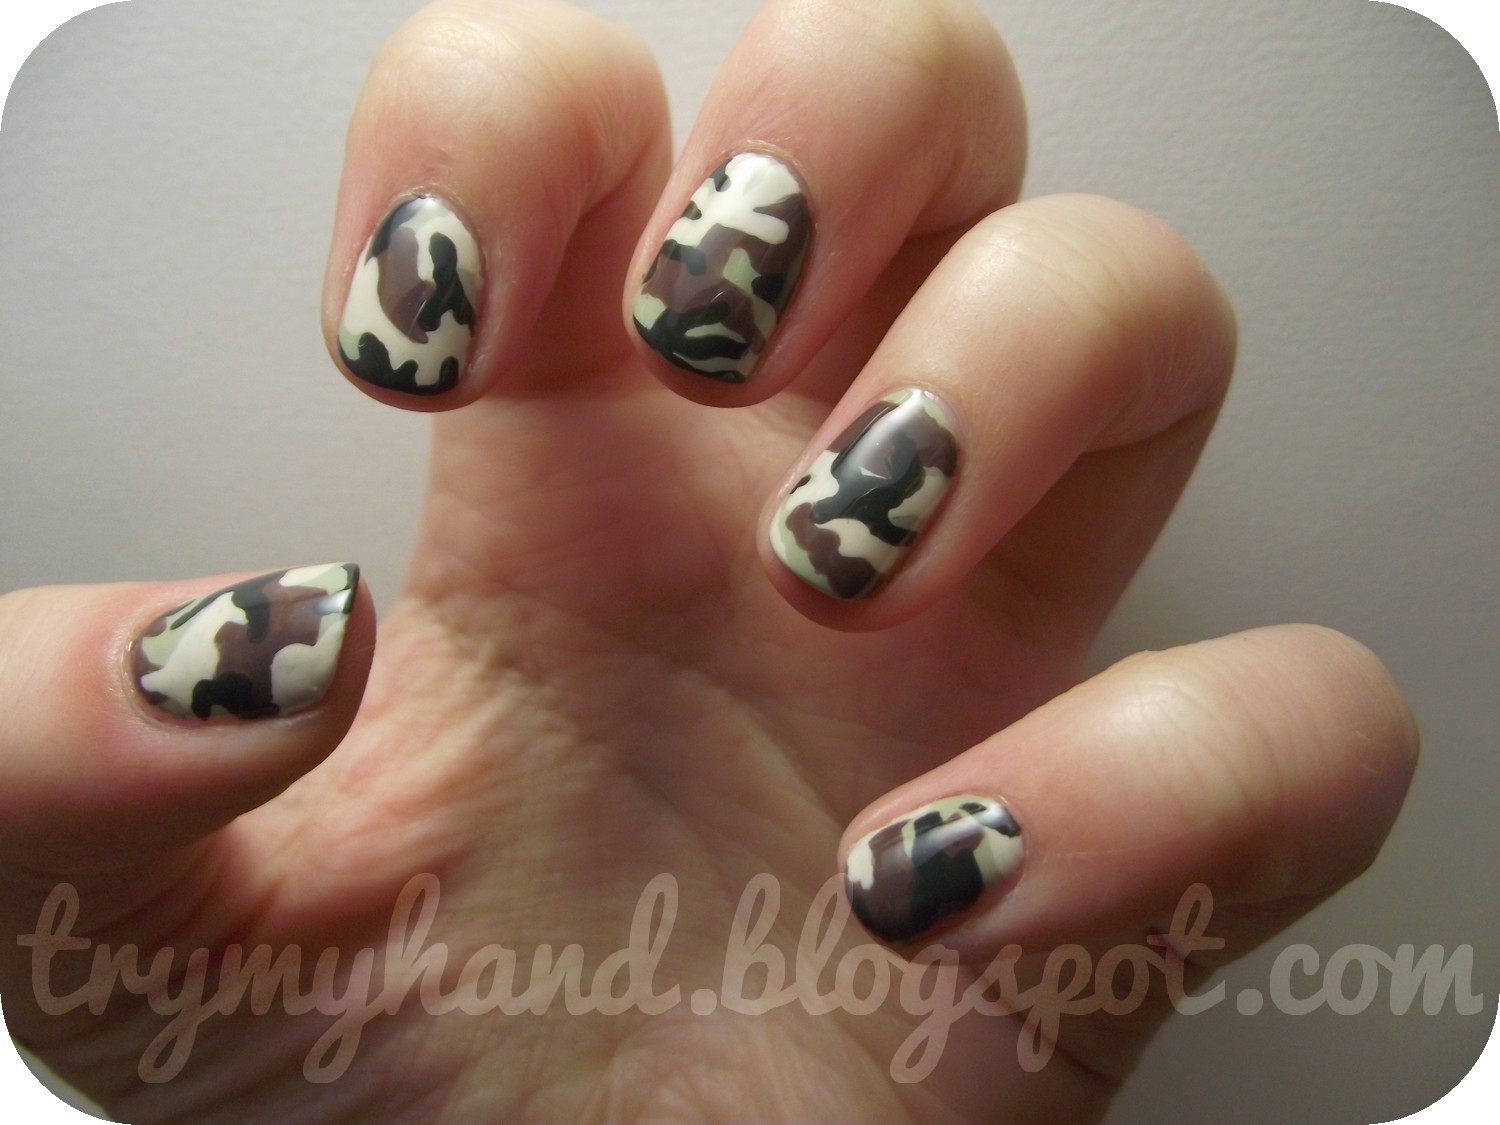
Alphabet Nail Art Challenge : C for Camo

Good evening everybody ! This is going to be a really quick post because I have some friends coming over in 10 minutes and so I really need to write this quickly ! I did these nails last night just before writing the post for "B for Bows", and so the lighting conditions weren't great (I prefer having the natural light as well as a lamp to light my lightbox) but the photos still look alright to me ! So, here are the nails !


I didn't think I had done camo nails before, but then I seemed to remember doing them some time last year, and it turns out I had indeed already done camouflage ! Looking back on it now, I much prefer my latest attempt at camo ! I think the different colours show up far better (you couldn't see the beige in last year's one) and the general look of the blobs is nicer ! What do you think ?


So for this design, I started off with OPI Stranger Tides, after umm-ing and ahh-ing for ages trying to decide when to do a darker mossy green sort of colour I finally decided that Stranger Tides would be fine ! I then blobbed on OPI You Don't Know Jacques, OPI My Vampire is Buff and OPI Nein! Nein! Nein! OK Fine! in that order on top of eachother.


I had contemplated putting some gold studs on top of each nail but ended up abandoning that idea as I was already quite pleased with the camo and didn't want to risk ruining it ! Perhaps I'll try adding studs if I do camo again, perhaps some square ones down the centre of a nail as an accent would look nice !

So that's it for today, I'm off to go greet people and enjoy my evening, so I hope you enjoy yours too !

Monday, 5 August 2013

Alphabet Nail Art Challenge : A for Aztec

Helloooo everyone ! So I'm back with a new post sooner than I had anticipated as I've found a great way for me to try to post more often this month ! I've been thinking of doing a nail art challenge for a while, and I found this "Alphabet Nail Art Challenge" image floating around the internet so I decided I'd give it a try ! From what I've gathered, this challenge was developed by atxlacquerista ! Here's the outline for the challenge :


So as today is the first day, let's start at the very beginning (a very good place to start ♫) ! "A is for Aztec", and it's been almost a whole year since I last had a go at aztec/tribal print ! I looked through a few google pictures to give me some inspiration for the design and then I just went ahead on did different designs on each nail !


For this design I started by doing a watercolour design for the base and then I painted the aztec print on top. I started with a base of OPI My Boyfriend Scales Walls and I used OPI Planks a Lot, OPI Sparrow Me the Drama and Essie Mint Candy Apple for the watercolour, then I used my Models Own black nail art pen to draw the design. I ended up leaving my right hand with just the watercolour base as I couldn't be bothered to do such an intricate design (I tried on my thumb and it looked awful so I just stopped there) !


You may have also noticed that I chopped all my nails down... as much as I liked the mini-pointed-nails look, I didn't like the length and I just decided it was time forme to have short nails again. I much prefer the size now, and they're much easier to look after !


So that's all I've got for you today ! I'll be back again tomorrow with tomorrow's challenge : bows, although I'll be sad to see this aztec design go, I REALLY love the way it looks, definitely one to try again in the future !

Saturday, 22 June 2013

Gradient Confetti

Hey there guys ! So I've been doing my nails LOADS this week so I have plenty to post at the moment, hopefully I'll be able to do my nails while I'm in Berlin, but I won't have my light box so lighting probably won't be great but I'll do my best ! Plus I'll only be able to take a few polishes with me so I'll be limited in that aspect, especially as I want to be able to buy some while I'm away ! We'll see what happens !


So I got this idea when I first got L'Oreal Confetti, you can see the swatch here ! I wondered what the different glitters would look like if they were over black and white, and then the idea struck me to do a gradient !


For this design, I used American Apparel Hassid and American Apparel T-Shirt to do the gradient, and then I used one coat of L'Oreal Confetti over the top. I really like the way the white glitter stands out over the black and vice versa, and I bet it'll look great over different bright coloured gradients as well, so many possibilities !


So that's all for tonight everyone, I'll definitely post on Tuesday, if not before ! See you all then !


Sunday, 26 May 2013

Swatch : L'Oréal - Confetti

Good evening everyone ! I know it's been a while since I posted anything, I've been doing my nails but haven't had time to write any posts really, so that's why it's been a whole since my last post ! My exams went really well, and I managed to do all the work I had in time, now I've just got two exams left and I'll be back in France on Friday (with all of my nails varnish, of course) ! So today I've got a really cool swatch for you which I'm really excited about !


So this is L'Oréal Confetti over OPI Suzi's Hungary Again !, my first ever black and white glitter nail varnish ! It's the first time anything like this has really been available over here in the UK, so naturally, I was really excited when I saw it in Boots and I had to buy it ! I also found ANOTHER black and white glitter polish on another stand, but that'll be for another time !


For this swatch I used just one coat of Confetti, the formula was alright, nothing special and it tended to clog up so I had to shake it in between doing every few nails. There are three sizes of glitter in both colours, plus it's got a subtle blue shimmer running through it which you can only really see over dark colours.


So all in all I'm pretty pleased with this nail varnish, despite the fact that the formula wasn't that great, it's still a novelty for me at the moment and I think I might be incorporating it into more of my designs if I'm doing skittles or accent nails !

I'm off to bed now everyone, I'm really tired at the moment for some reason so I'm going to try to get an early night so that I can do plenty of revision tomorrow without getting too distracted ! See you all again soon, hopefully it'll be less than a week this time !

Sunday, 19 May 2013

NOTD : Oh Splat !

Hey there everyone ! So I've had an absolutely manic week which explains why I haven't been able to post anything since Monday ! I went to visit some friends in Oxford earlier in the week, and then when I got back I had an essay due for the next day so I ended up having to pull an all-nighter (not something I would recommend, it was my first time and I suffered the next day) ! Everything was okay in the end though, and I got everything handed in in time ! And obviously last night was Eurovision so I was otherwise occupied there, and now I'm revising for a Russian exam I have tomorrow, happy days right ?! So anyway, I still somehow managed to fit in doing my nails at some point in the week, on Friday I think, so here you go !


I'm not sure where the inspiration for these nails came from, but I really like the way they've turned out, it was more time-consuming than the traditional splatter mani, but I still enjoyed doing it and making it look as though paint had just been thrown at my nails !


For this design I used OPI My Vampire is Buff for the base, then I used American Apparel Hassid and my nail art brush to paint on random blobs and dots here and there ! It was really quite simple, and doesn't require any real skill, I suppose you could even do it with just the brush from your bottle of nail varnish ! Simple !


So that's all I've got to show you today, I've got another busy week ahead of me (well, until Friday) but I'll try and fit something in all the same so that I can post at some point, here's hoping 

Saturday, 4 May 2013

May the 4th Be With You

Happy Star Wars Day everybody ! I've been wanting to do May the 4th nails for aaaaages now and I've finally been able to post something properly (albeit a scheduled post and I'm still wearing my harlequin nails), plus the fact that it's my sister's 18th birthday tomorrow and she loves Star Wars, which is an even better excuse !


So I decided to just do plain Stormtrooper helmet nails as they were relatively quick a easy to do ! I was really approximate about drawing them and didn't go into much detail, but I'm really pleased with how they look ! Mayb next year I'll be able to do something detailled and with more characters, we'll just have to wait and see !


For this design I only used two different polishes : OPI My Boyfriend Scales Walls for the base, and then I used my Models Own nail art pen in black, simples ! It only took me about 15 minutes to do the whole design, so it was really quick and easy !


So that's all I've got for today, I have one more scheduled post for you before I'll be back and able to post anything on Wednesday, so stay tuned until then ! Happy Saturday everyone !

Thursday, 18 April 2013

NOTD : Springtime Pastel Flowers

Hey there everyone ! I'm making the most of this rare free time (where I'm not actually procrastinating) by doing my nails as often as I can, so luckily for you, I've got yet another blog post ! Wow, two days in a row, it's been a while ! So some of you may have seen the new pastel nail art pens that Models Own released the other day, and as soon as I saw them I showed them to my mum who VERY kindly ordered them for me ! I received them yesterday, and naturally couldn't wait to use them !


So I wanted to do a design that incorporated all of the different colours of nail art pens that I received, and I'm really happy with what I came up with ! I think that the dark base really shows up the pastelness of of the nail art pens that I used, plus, there's nothing better for Spring than a good old combination of both a floral and pastel design !


For the base I used OPI Nein! Nein! Nein! OK Fine!, then I used all of my new Models Own nail art pens in pink, purple, yellow, blue and green, plus my Models Own nail art pen in black to do the little dots on some of the flowers. I really love the way the different colours come together in this design, and I can't wait to use these pens in other designs !


So that's all for today really, the only real comment I have to make about the pens is that they dribbled quite a bit, but that's nothing too drastic and it's still perfectly manageable ! Maybe soon they'll bring out a red nail art pen to complete my collection !

I'm off to bed now everyone, see you all again soon !

Wednesday, 17 April 2013

Review : Born Pretty Store - Black Rhinestones

Good evening everyone ! Today I have a very special post for you all, my first ever review ! I was contacted by Born Pretty Store a couple of months ago, and it's taken me a while to get round to finding enough time to do it properly (wouldn't want to do it half-heartedly would I ?), but I finally got the time after I finished the mountains of work I was catching up on from after the Easter holidays ! So behold, my review !


So today I'll be showing you the 1.5mm black resin rhinestones which I used to create an easy studded nail art design that I really really love ! The rhinestones come in a pack of 10,000, so there's plenty to last you ! The bag that they come in is plastified and very sturdy, although once it's open you have to seal it back up with selotape or if not then transfer the contents into a closable container, as there is no reclosable seal on the packet.


For this design, I just layered the rhinestones over two coats of Essie Mint Candy Apple, I wanted to do something simple to show them properly. I really love the size of them, they're not so big that they take up too much space on the nail, and it's nice that they look so small and dainty !


I think I'm going to get quite a lot of use out of these rhinestones, and I can't imagine I'll be running out of them any time soon thanks to the sheer amount that come in the packet ! The only real downside I can think of for these rhinestones is the fact that you can't re-seal the packet, although this is far from insurmountable, so not a real problem with the product !


If you are interested in purchasing these 1.5mm black resin rhinestones, then head on over to Born Pretty Store, they do loads of nail and beauty accessories for really good prices as well as free shipping worldwide. And as if that wasn't enough, if you use the coupon code MQL91, you can get an extra 10% off your order ! Happy days !

Tuesday, 12 March 2013

Inspired By : Kenzo Resort 2013

Good evening everyone ! I am SO tired for some reason, probably because it's almost time for me to go to bed (and I probably will do just that once I've finished this post), but seeing as it got too late for me to post anything last night, I thought I'd better not leave you without a post for yet another evening !


So I was just looking through the internet for nail inspiration the other day, when I came across this design by Kenzo for the Resort 2013 season. I knew it would translate well into a nail design, so off I went to start with the painting ! Unfortunately I didn't wear this design for very long as I dented my thumb pretty soon after taking the photos, so I went on to do something else !


For this design, the nail varnishes I used were OPI My Vampire is Buff for the base, and then I used Catrice Salmon and Garfunkel for the spots which I then outlined with my Models Own Wah Nails nail art pen in black. I really liked the way this looked, and it's a shame that I had to take it off so quickly, but there's an endless amount of colour combinations you can do with this design !


And that'll be all for today everybody ! I'm going to go to bed whilst watching some Harry Potter, always a great way to get to sleep ! See you all again soon everyone !

Sunday, 10 March 2013

NOTD : Geometric Diamonds

Happy Sunday everybody ! So on Friday I eventually got round to doing my nails (finally) after my floral design from last Sunday, but I never seemed to be happy with the design I did until about midnight last night, which is why is didn't end up posting anything until now ! I am however super-pleased with this design (even though it's gone now due to important swatches that needed to be done), but I think I need some really really really nice weather to come along and inspire me now !


Basically I've been working on a diamond sort cubey tessellation drawing thing while I've been watching TV for the last week, and seriously felt to the need to do it on my nails, but I really couldn't be bothered because I knew it'd take forever to paint ! And I was right, it took about 2 hours to do, and I only did one hand (there was no way I was going to stay up any longer just to struggle recreating on my right hand as well). I am really really pleased with how it looks though, maybe next time I'll do the pattern slightly bigger so I don't have to do as much small detailing !


For this design, I started off with a base of OPI My Boyfriend Scales Walls, then with a LOT of patience, I used American Apparel Hassid and OPI Can't Find My Czechbook for the diamond shapes that make up the pattern. I really like how cool it looks, and from a distance it really does look like it's a nail wrap or something, which is always good !


So that's all for today ! I now have plenty of designs for posts this week, I've got lots of work at the moment so not so much time for nails, so it's just as well that I couldn't decide on anything these past couple of day ! What do you think of tessellation designs like this ? Would you paint it despite the amount of time it takes to do ?

I'll see you all tomorrow hopefully if I get time to write a post, but until then, have a great day !

Saturday, 2 March 2013

NOTD : Framed Watercolour

Hellooooo everybody ! So I'm doing a really quick post this evening as I've got to get moving, staying with a friend tonight so I won't be able to post anything at my usual time ! I actually did my nails at a reasonable time today, which means that this  post is ready to be done nice and early before I have to go !


So I hadn't initially planned on doing framed nails, as I was going to attempt doing "spotted" nails, however that failed miserably, and my watercolour base needed something to make it pop ! I think this design looks far more effective in person than it does in the photos, as the close-up really shows up the imperfections !


For this design, the nail varnishes I used were OPI My Boyfriend Scales Walls, OPI Dim Sum Plum, OPI Planks A Lot, OPI My Very First Knockwurst and Essie Mint Candy Apple. For the framing, I used American Apparel Hassid, some nails turned out better than others, especially on my left hand compared to my right hand, but it's minor when looking at them from a distance !


So that'll be all for this evening ! I'll hopefully do my nails again tomorrow if I finish my homework early enough, we'll have to see !

Have a great evening everybody !

Saturday, 8 December 2012

NOTD : Duotone Skittles

Helloooooo everybody ! Now normally I would have posted something for you all last night, but I had some friends over for an early Christmas meal before we break up for the holidays which was great ! We even had our own personalised Christmas crackers hats (and would you believe that mine had nail varnish on it ?) ! But anyway, I'm back today with a NOTD for you all !


I was going to carry on with another manicure for my Advent Calendar series today, but I wasn't really feeling the Christmas nail inspiration when it came to doing my nails, so I just went with a simple pattern design ! I really love how the houndstooth turned out on my thumb, but for some reason it doesn't look right, and I can't seem to work out why !


So for this design, the colours I used were OPI My Very First Knockwurst, and then I did all the black detailing on top using my Models Own Wah Nails nail art pen in black. I just looked up different black and white patterns on google images and it was pretty easy to fill up all 10 nails with a different pattern on each !


And here's an extremely bright iPhone picture to show you all what I did on my right hand (seeing as I can't physically hold my camera in my left hand and take a successful photo) ! Anyway, that's it for today, I hope you like this NOTD in comparison to all the Christmas nails I've been showering you with !

See you all tomorrow everybody !
Related Posts Plugin for WordPress, Blogger...